


DIY Console Table with Shelf: A Stylish Addition to Your Home
- Angela Kuchenbecker
- Jul 26, 2025
- 3 min read

Updated: Jul 28, 2025
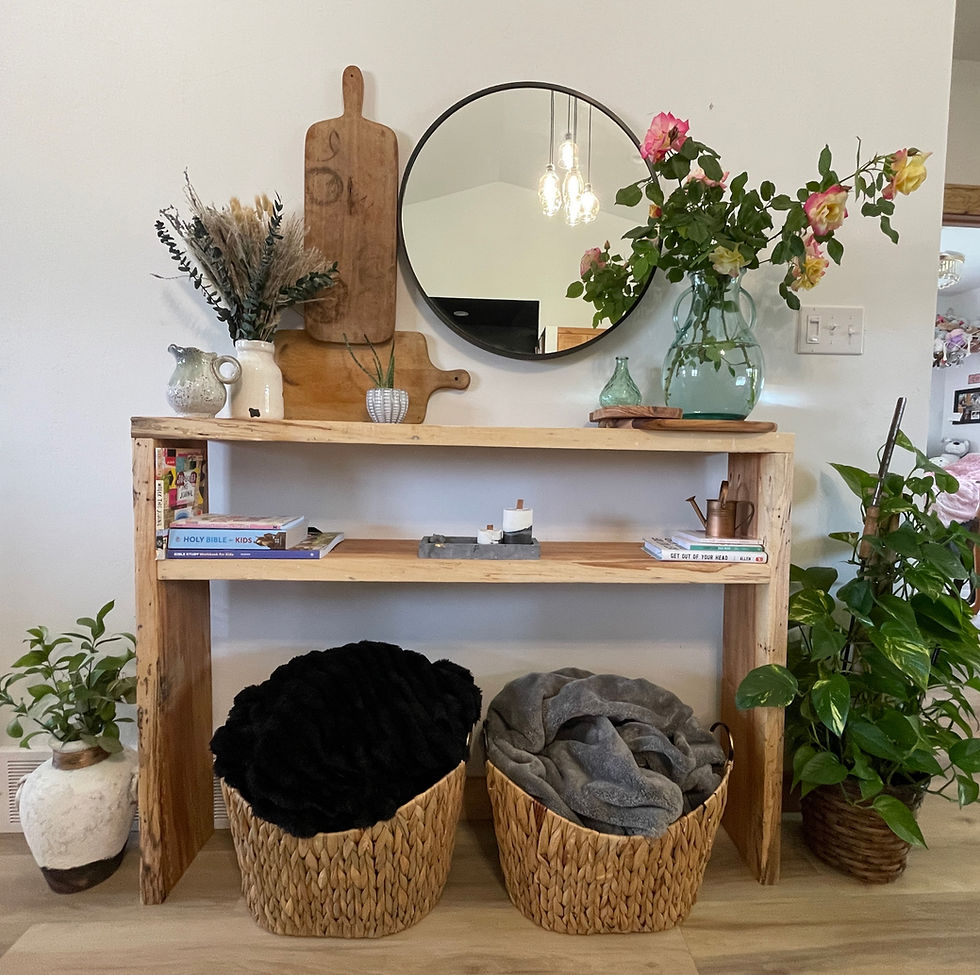
Building your own DIY console table is not just a fun project; it's a chance to sprinkle some of your personality into your home décor! This design features a fabulous 24" round mirror that acts as the star of the show, adding flair and a touch of elegance to your space. Plus, mirrors are like magic windows that make a room feel bigger and brighter—who doesn’t love that?
Here’s a step-by-step guide to help you build a console table like the one in your photo. It’s a simple and rustic design made primarily from 2x4s or other dimensional lumber. The natural wood and minimal joinery make it a great beginner-friendly project.
Dimensions: adjust to fit your space
Height: ~32–34 inches
Width: ~48 inches
Depth: ~12–14 inches
Shelf spacing: ~15 inches between bottom and top shelf
Materials & Tools
Materials
(2) 2x12 boards for the top and bottom shelf (48" long each)
(2) 2x4 or 2x6 boards for the sides/legs (32" long each)
(2) 1x2 or 2x2 strips for shelf support (cut to 11”–12” each)
Wood screws (2.5" screws)
Wood glue
Sandpaper (80–220 grit)
Wood finish (optional: clear coat, stain, wax, etc.)
Tools
Power drill I used this Dewalt set, it's awesome and great value!
Saw (circular, miter, or table saw)
Sander or sanding block
Measuring tape
Clamps (optional) I used these corner clamps
Square (for clean 90° corners)
Instructions
Step 1: Cut the Wood
Cut your boards to the following dimensions:
(2) Top and bottom shelf: 48" L (can adjust for your space)
(2) Legs: 32" H
(2) Shelf supports: 11–12" (to support the bottom shelf underneath)
Step 2: Assemble the Frame
Attach the legs to the top shelf:Place the legs flush with the outside edges of the top shelf. Drill pilot holes and screw up through the top into the ends of the legs (or use pocket hole screws if you prefer a cleaner look).
Attach the bottom shelf:Position the shelf 2–4" from the floor (or however high you'd like). Secure the support cleats (the small strips) to the legs first with glue and screws, then rest the shelf on top and screw it into place.
Step 3: Sand and Finish
Sand all surfaces smooth, especially edges and corners.
Clean off dust and apply your desired finish (clear poly, oil, stain, etc.).
Step 4: Style It
Place baskets underneath for storage, and add decorative items like books, plants, or vases on top—just like in your photo.
Notes
You can use reclaimed or distressed wood for a rustic look.
If you'd like a floating shelf effect for the bottom, use pocket holes or install hidden brackets.
Styling the Console Table
Now comes the fun part: styling your new console table! Here are some tips to make it shine:
24" Round Mirror: Hang this beauty above your console table at eye level. It’ll not only look fabulous but also bounce light around, making your space feel airy.
Cutting Boards: Add a collection of chic cutting boards to your decor. You can display them upright against the wall or stack them neatly on the tabletop. Mixing different wood types adds a fun texture!
Plants: Bring in some greenery with potted plants! Mix tall and trailing plants to create visual variety. Succulents, ferns, or blooming beauties will liven up your console table.
Baskets of Blankets: Underneath the table, place some woven baskets filled with cozy blankets. Not only are they practical for chilly evenings, but they also add a warm, inviting vibe. Choose baskets that match your room's colors for a seamless look!
Books: Practical and add character and warmth to a room. The diverse colors, sizes, and bindings allow for personalized design, reflecting individual interests and style. Whether in a cozy nook or a formal study, books contribute to decor and invite curiosity, making them essential to any well-designed environment. Some of our books.
Summary
Creating a DIY console table with a shelf, complete with a stunning 24" round mirror, stylish cutting boards, lovely plants, and cozy baskets, is a fantastic way to add both function and flair to your home. This project is all about expressing your creativity and making it uniquely yours. By carefully picking out your materials and thoughtfully arranging your decor, you’ll create a gorgeous focal point that not only enhances your living space but also serves as a practical storage solution.


Comments